Showing posts with label Quilt. Show all posts

Thursday, February 21, 2019

Blanket Ladder


Warm comfy quilts are amazing!  If you have read any of my posts, then you know that I really enjoy making quilts.  At our house, we have quite a collection mounding and what a better way to display them and make it easy to pick what you want than by a blanket ladder.

After looking how much these can actually cost, I decided a DIY project was going to be in my future.  I found some really good plans from Shanty 2 Chic and made 1 modification to their plan.  The original plan called for it to be a 5’ ladder with only 4 rungs- well let’s face it, I need a few more than that!  My ladder ended up being 6’ with 5 rungs- everything else the exact same!  I decided to give my ladder a quick sanding so that neither me nor the quilts would get snagged by unfriendly wood. 

If you are wanting to get into wood working, the ladies have super easy to follow plans and I would highly suggest taking a look at what they have. 
Assembling the ladder- with my trusted helper 


Blanket ladder completed!


Thursday, March 2, 2017

Colorful block quilt

In case you were wondering, I like to sew. I have a slight problem though...when I walk into a fabric or craft store, I always walk out with fabric. Usually fabric I do not even need.  This realization really hit home for me when I was packing my belongings for my next move and I realized I had almost as many tubs full of fabric as I did my own clothes.  Oops.

Good thing before I moved I decided to go through a little bit of my fabric and make a super crazy colorful quilt with random pieces of fabric that I had left over from other projects.  I love how colorful and fun it is.  Because I do not have a large machine, for the quilting I decided to do straight lines along all of the seams.  As always, my little helper was there to make sure it worked really well- I think she approved.

The kitty cat had to stay warm

It is a Queen Size!

Friday, February 24, 2017

Remembrance t-shirt quilt

I had a friend of my Mom's contact me after she had seen one of the t-shirt quilts that I had made.  Her father had passed away and he had numerous very funny shirts.  She asked me to help her remember her father by creating a quilt with all of his favorite t-shirts.

I absolutely loved how it turned out.  All of the shirts were different sizes which made the placements of everything a bit more challenging than originally expected.  Because there were not enough shirts of just the right size, I included some fun printed fabric to fill in where other t-shirts would go.

Now to finally make one for myself...


Monday, January 20, 2014

Cancer Quilts

I love quilting!  It is a great stress reliever and I get to use the creative side of my brain- I don't do many other things that are what I would call extremly creative.  At work, we have a relay for life team and after talking with them, I volunteered to make them not one, but two quilts - one t-shirt quilt (memory quilt) and one "HOPE" quilt.  We raffled off both of them to help support the American Cancer Society.


Font of "Memory" quilt
Back of "Memory" quilt


Front of "HOPE" quilt
Back of "HOPE" quilt


I thank everyone who donated money to put in for the raffles- all of my time and supplies were donated.  Between th tw quilts, we were able to donate over $750 to the American Cancer Society for Relay for Life!

Tuesday, January 8, 2013

Happy New Year!

Happy New Year!!!  I know... a little late as it is already the second week into the new year.  But, I have been very busy working on new tutorials, projects to teach on Thursdays, and the numerous unfinished projects that I have.  I am very excited for this year and all of the creating I plan on doing.  I am going to be updating my etsy shop with several new items over the next couple of weeks. 

As for the Thursday classes, I have been working on several things (all pictures to be posted as the project are completed but before the scheduled class dates) and I think that we will be having classes on one Thursday a month, unless the project will take longer, then we will have it twice that month.  If there is anything you want to learn how to do, just let me know and I will get something worked up for it.  Based on suggestions this last year, this years projects include:
- how to applique and reverse applique
- make reusable grocery bags with a carrier (learn how to do a French seam) (Class on Thursday, January 24th)
- a convertible clutch (really cute clutch!... picture will be here by the end of the month)
- cosmetic and toiletries case
- zipped pouch in three sizes
- satin lined sleep mask
and my favorite...
- a faux leather handbag

I promise, as soon as the items have been completed, I will get pictures up online.  Look for the reusable grocery bag with carrier by early next week.  I will get a supply list online over the next couple of weeks as well.  I have had to completely re-do some of the patterns and am working on all of the instructions right now too. 

Over the holidays, I have also worked on the quilt a-long quilt- keep an eye out this weekend for the next "week" of quilt steps.  Clearly, I need to try to not take on so many projects at once as it has been several weeks since last time I update you all about the quilt a long.  I am really good at starting lots of things, but then get distracted and end up with a ton of things only half-way done.

I think my New Year's resolution will be to get all of these little projects completed this year!

One thing that I was able to completely finish over the holidays was the t-shirt quilt for my sister.  I gave it to her for a Christmas present and got it done right before I gave it to her so I did not have a chance to get pictures.  But I have a wonderful sister who took some when she got home.  She had to lay it on her bed because she is not tall enough to take the picture (it measures 70"x70"- HUGE!!!)  I think she liked it and she has asked me to help her make another one.  I really liked doing it; brought back some of the memories of things that we did together in college.  Hopefully it will keep her warm up in the north- after all, it is 70"x70"- plenty of room to curl up on the bed with during the winter.. 

Front of t-shirt quilt

Back of t-shirt quilt

I hope you all have had a good new year so far and have a great year!  I will get more tutorials and pictures up over the next couple of weeks.  Keep checking back or sign-up to receive emails when new blogs are posted. 

Have a great day!

Monday, November 26, 2012

Quilt Sizing

When I first started quilting, I always wondered, what size quilt do I need to make for a (fill in the blank) size bed? Or lap quilt?

Well, after looking at many books and blogs, I have complied what each size should be around.

First off, I would like to list some basic quilt sizes:
  • A nice baby size quilt is around 42"x52".  Between 36"x36" and 52"x52" is the range for a baby size quilt. The size can depend on whether the quilt will be use in a crib.
  • For  square baby quilt, anywhere from 36"to 42" works well
  • Toddler- 46"x70" for a quilt. A toddler bed most often uses a crib mattress, however, not always, so it is best to measure first.
  • A crib quilt measures between 30"x46" and 36"x50". If you are making this sized quilt as a gift, see if you can get the measurement- each manufacturer has their own sizes and crib mattresses are different sizes too.
  • Wheelchair lap quilt- 36"x36" to 38"x47"
  • A nice size lap quilt is between 52"-68" wide and the length can be from abut 52"-78"- although a lap quilt can be any size. A quilt that a child will want to bring along could be as small as 36"x36". A lap quilt that is 42"x60" is great for cuddling up on the couch with.
  • Twin- between 64"-72" wide and the length can be from about 86"-96".
  • Full is typically between 70"-88" wide and 88"-100" in length
  • Queen- between 88"-99" wide and the length usually measures 94"-108"
  • King- between 94"-108" in width and 94"-108" in length
If you are making a quilt that will go on a bed, use the following guide

          U.S. Mattress    Comforter    Bedspread
Crib     27"x52"              36"x60"
Twin    39"x75"             65"x88"     81"x110"
Full      54"x75"             80"x88"     96"x110"
Queen  60"x80"             86"x93"     102"x115"
King     76"x80"             104"x93"   120"x115"

Comforter- (at other than crib size) includes a 13" drop on 3 sides and no pillow tuck
Bedspread- includes a 21" drop (a typical bed height) on 3 sides, and a 14" pillow tuck

For a custom size quilt for a specific bed, use the following guide:
  • measure the mattress, length and width, and depth (most mattresses measure 8-12", but the newer deeper ones can measure up to 20")
  • add to each measurement the amount of drop you would like down the side of the bed (to the floor, to the bottom of the top mattress? to the bottom of the box spring?)
  • remember to add a pillow tuck (this may depend on the depth of the pillows and how much of a pillow tuck you want), if you want a portion of the quilt to tuck under the pillows, and then carry on over top of the pillows.
An easy way to add a drop (depending on the quilt pattern you are using), your borders could be the drop.  For example, if you want an 8" drop, add an 8" border to your quilt top.

Hope this helps.  Just remember- give the quilt some personality!

Thursday, November 22, 2012

Quilting and Sewing Product Review

Rotary Cutter:
The best rotary cutter I have found is by Gingher (you can buy it at Joann's Fabric Store)- they have it for both right and left handed people!

Rotary Cutting Mats:
The brand that I have found to be the best is Olfa.  It is "self-healing", 1.5mm thick, has contrasting clearly marked yellow cutting lines with a green background.  I have tried other brands of cutting mats and this brand is the only one that has not snagged some of my silk fabrics from old cut lines with the rotary cutter.
Sizes available:
5.5"x7.5"
12"x18"
18"x24"
24"x36"

I have  one of each of the sizes, depending on what my current project is.  The 12"x18" is great for classes and the 24"x36" is great for large craft projects and garments.

Rotary Rulers:
I like the brand, Omnigrid the best for a ruler when using my rotary cutter because it is clear with bright yellow and black measuring lines to easily be seen on both light and dark fabrics.  The rulers allow for an extra 1/2" seam allowance and diagonal angle lines.
Sizes:
The four pack comes with squares of 4-1/2", 6-1/2", 9-1/2", 12-1/2". You can buy it at Joann's.
6-1/2"x24" is great for cutting strips and has both a left and right handed numbering system with diagonal lines.

To hold all of my rulers, I have a wooden ruler rack that works perfect to keep everything organize.

Quilt Batting:
The batting by Warm Company, specifically the Warm and Natural line works really well for quilts.  This batting is:
- 100% cotton, unbleached
- does not separate or bunch
- you can quilt up to 10" apart and it will still keep its shape
- the fabric clings to the batting, so once placed, it stays in place easier
- keeps its shape wash after wash
- does not give the "puffy" look to quilts
- comes in all different sizes including 34", 45", 90" and 124" by the yard and by the bolt
- soft and gentle for children and babies

Quilting Pins:
Curved safety pins- 1-1/2" length.  These are a good length for all thickness of a quilt.  The fork pins always seemed to poke me and the shorter curved safety pins were too hard to get all layers of a thicker quilt.

Sunday, October 28, 2012

Quilting apps for the iPhone

Someone told me about a few apps for the phone that are made just for quilters. They have already been very helpful to me when figuring out crazy quilt designs (such as my crazy ragged quilt) so that I know how much fabric I need for these projects. I put the link to iTunes if you want to check them out.

If you have a great sewing or quilting app, I would love to hear about it!

For iPhone and iPad:

QuiltingCalc by Robert Kaufman
Price: Free

QuiltFab by Mary Kay Podlecki
Price: Free


BlockFab by Mary Kay Podlecki
Price: Free


Thursday, October 11, 2012

Flannel rag quilt

I love this quilt because it is easy for a first time quilter and it is about as warm as it needs to be for Texas winters.

Each of the squares are 8"x8". I sewed an "X" in the middle of each square for the quilting part. It measures 8x10 squares with a 5" boarder for a total of 61"x75".

Ragged and solid sides of the quilt
Ragged side of the quilt

Sunday, September 23, 2012

Matching quilt pieces

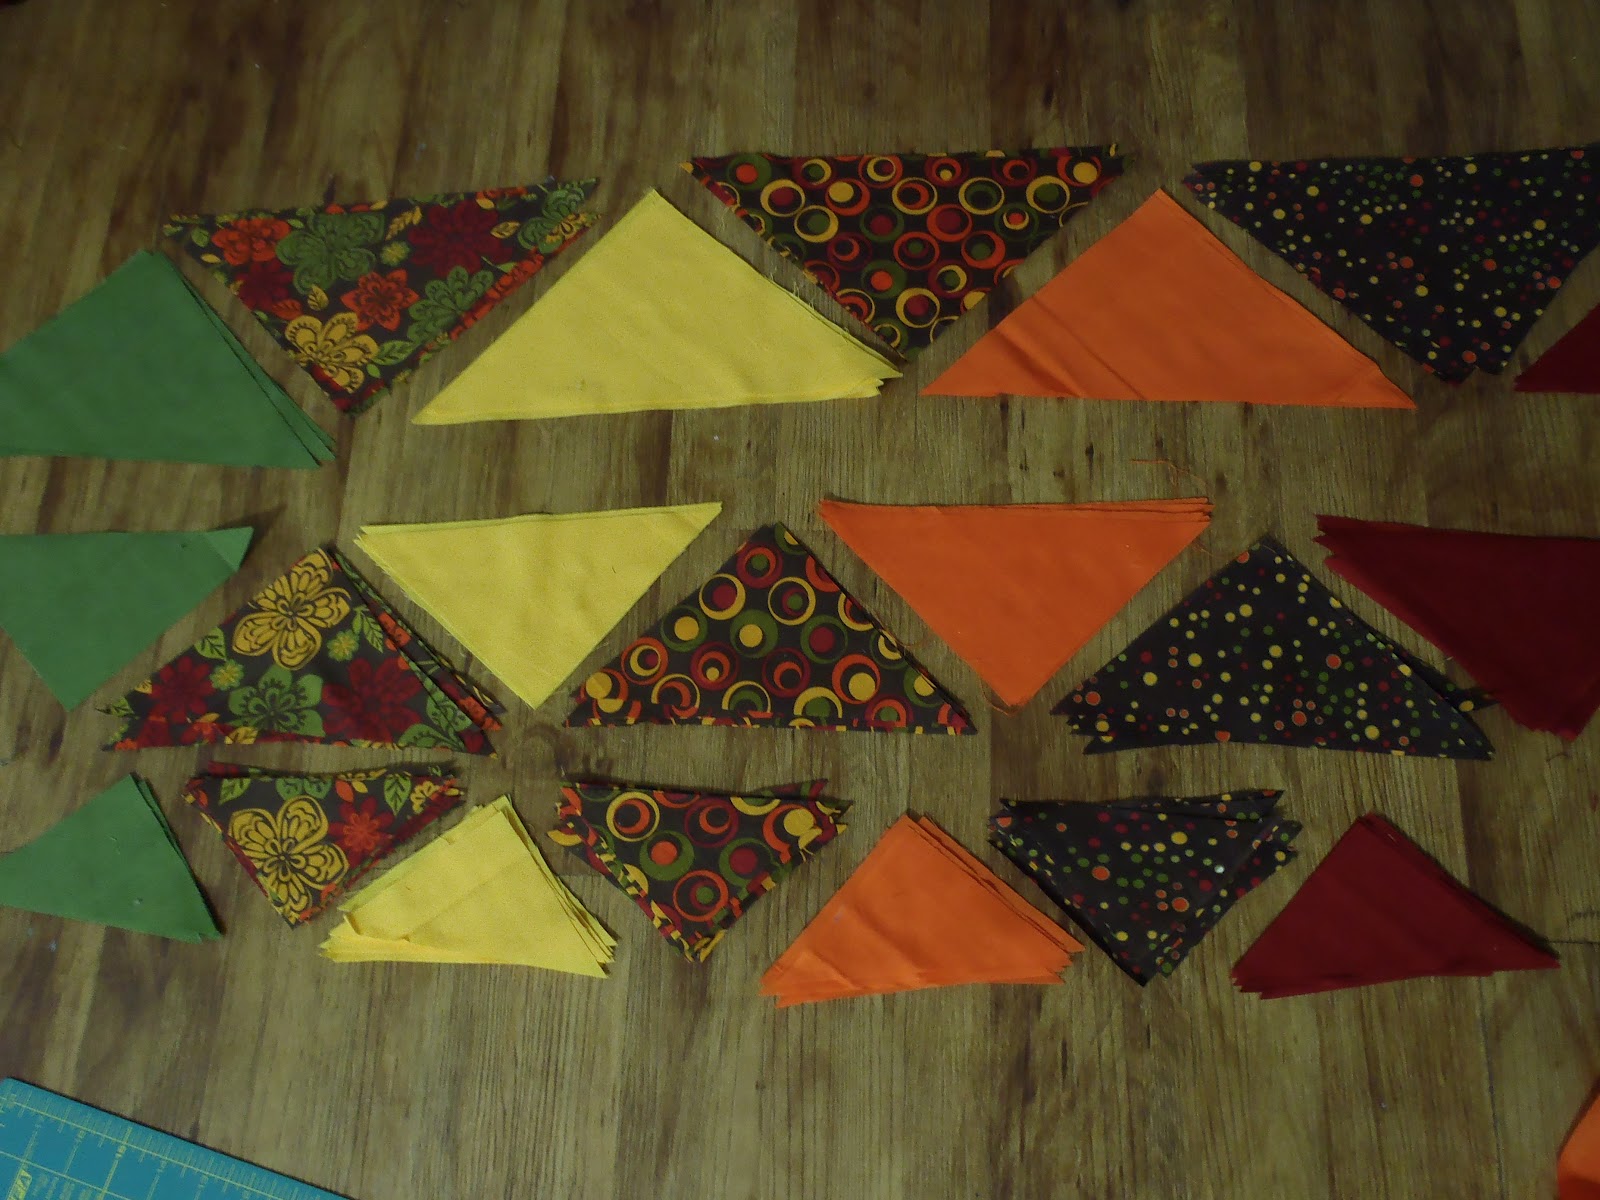
The last couple of weeks I worked on matching all of the pieces of fabric.  It was easiest for me to put all of the colors in order and then pull in order for each block.  For example, I used the following order for my blocks so that I did not ave any two colors touch.


Color #1- Green
Color #2- Flowers
Color #3- Yellow
Color #4- Dots
Color #5- Orange
Color #6- Circles
Color #7- Red


Time to match all of the blocks.  The way I set it up is that that I have 7 unique blocks.  I have started with the first of seven.  Take care when matching the triangles.  You want to make sure that when each half of the triangles are put together, they match as a single square.

Block one cosists of the following triangles:
Large green, medium flower, small yellow, small dots, medium orange, large circles

Block two:
Large red, medium green, small flower, small yellow, medium dots, large orange

Block three:
Large circles, medium red, small green, small flower, medium yellow, large dots

Block four:
Large Orange, medium circles, small red, small green, medium flower, large yellow

Block five:
Large dots, medium orange, small cirlces, small red, medium green, large flower

Block six:
Large yellow, medium dots, small orange, small circles, medium red, large green

Block seven:
Large flower, medium yellow, small dots, small orange, medium circles, large red


Again, this is just how I matched my triangles.  You can of course match however you want.  By doing it this way, the same blocks will line up diagonally for a pattern.

Tuesday, August 14, 2012

Scrap quilt

As I mentioned in week 1 of the quilt along, hang onto those scraps!  Below is one of the blocks that I made from random other quilts and projects.  At this rate I will have a block for each of the quilts and projects that I do. 

Saturday, July 28, 2012

Quilt along- picking fabric and cutting

So I have a HUGE stash of fabrics.  Some I have bought with I am sure something in mind, and some of it I do actually remember why I had bought it.  This fabric is some that I had bought last fall with EVERY intention of making a quilt.  Well I am now almost out of room in my fabric stash, so now it is time to make this quilt... So a quilt along anyone? 

I liked the ragged quilt my sister had made and had also seen a quilt that just had a whole bunch of mis-matched squares.  These are the two quilts that I used as an inspiration for my quilt.

Materials:
-1.5 yards of 7 different colors of fabric (I used four solid colors and three fabrics with a design)- total of 10.5 yards with a little left over
- 3/8 yard of coordinating fabric for binding
- batting (I like the 100% cotton batting)
- 3 5/8 yards for backing


 I want a quilt that will be a good sized lap quilt- so about a 48" x 64".   As with my sisters ragged quilt that has ragged squares, I want it a little more intrecit and have it as ragged triangles. 

For the first week, I cut all of my triangles.  The large squares measured 8.5" x 8.5"; medium squares were 6.5" x 6.5"; and the small squares were 4.5" x 4.5".  I needed 7 squares of each size and each color.  I then cut each of them in 1/2 to make 14 triangles of each size and each color- total of 96 (you will only need 13 triangles for two of the colors of each size).  With each of the large squares measuring 8.5" x 8.5" with a 1/4" seam allowance, I will have a quilt with 6 squares along the top and 8 down the side, this quilt will measure 48" x 64"- slightly smaller, but still a good size.


Next week I will be working on mixing and matching the triangles to get 96 stacks of triangles.  Lots of sewing ahead!

Be sure to keep all of the little scraps- they will make a great quilt later... another project!

Thursday, May 31, 2012

Quilt by Sister

Front of quilt
Back of quilt

We are a true Baylor Family! My sister has some of the best quilts and ideas...if only she had more time to create everything she came up with...