Wednesday, February 20, 2019

Medal Board

I love to run and collecting the bling has been a great inspiration for me to keep running!

I ran my first road race in September 2013 with a few of my girlfriends.  It was a long, hot grueling race in the middle of the Texas summer sun.  The race itself was fun, but did I mention it was HOT!!!  It was a flat 5k and the race got me the taste of racing that I love today.  Fast forward to race #6 in April 2014 where I got my first medal.  Yes, a participation medal, but bling none the less.

During a race in 2015, I overheard someone say that they goal that year was to run 15 races for 2015.  I thought that sounded like a great idea and decided that 16 races for 2016 was where my mind was set.  My now husband (he still could have backed out with my crazy ideas at this point) decided to do it with me.

Between the medals my husband has and the ones I have, we needed a good way to display them.  We decided on a medal board.  Because we made this one ourselves, we were able to completely customize it to our wants.  Basic guide on how we did it is below.

Medal Board Completed!
 I absolutely love how it turned out!  Although my husband has said he does not have a desire to ever do a marathon, he still has a spot for a time in the event he changes his mind.  For now, we just try to beat our best times each time we race.

Materials:
1- 1x12x2ft (length is up to you) pine board
pre-stain
stain (color of your choice- Jacobean was used for this project)- we typically use Minwax for the pre-stain and stain; it is easy to apply and I really like the color options
chalk board paint
vinyl & vinyl cutting machine
Hillman Steel Screw Hooks (however many you want)- we used 44 total- 22 on each row
Sander with 220 grit sandpaper

Instructions:
1. CUT: After identifying what we wanted the board to say (our names on each of the sides with the 5k, 10k, half, and full) we were able to determine the legnth of board that would be needed.  A 2ft cut board seemed to work the best.  You can find 1x12 boards at your local hardware store. You do not need any fancy wood, we ended up with the select pine which is the higher end pine just so that we had a smoother, non-twisted board.

2. SAND: We cut the board down to the 2ft and gave it light sanding with a 220 grit sandpaper.  If you board is super rough, you can start with a 180 grit and then move to the 220 grit to give it the finished smooth feel.

3. STAIN: For the stain, we decided on a bit of a darker color, Minwax Jacobean, which gave the very rich look we were looking for.  We did go with a second coat so that the stain could really soak into the grain and give an extra rich look.  TIP: For best results when staining, use a pre-stain which helps the wood take the stain.  TIP: Wipe off extra stain and then let dry. You want the stain to go onto the wood in a smooth even tones and by wiping off the excess, you will reduce the chances of blotchy wood spots.  You can always put on additional coats of stain but it is harder to remove the blotchy spots caused by excess stain.  You will know the stain is dry when it is not sticky to the touch.

4. PAINT:  Although the stain can says it is dry in a few hours, we did let it dry overnight as we were going to paint on top of the stain on one side.  We taped off 1" around the top and sides with painters as we had 1" painters tape.  For the bottom, we left a 3" space for the medal hooks.  Two coats of black chalk board paint later, and we were ready for the hooks.

5. HARDWARE:  We started off with 22 hooks along the bottom and then quickly realized our love of running has made it so that we needed room for more medals, so a total of 44 hooks were used.  We spaced them an 1" apart horizontally and in between the top row for the 2nd row. (More tips on how to add hardware will be in other posts.)

6 FINISHING TOUCH:  I used my Cricut Maker to cut the white vinyl names and race distances.  When we first made the board, I had just hand chalked on the board- I love the way the upgrade turned out!

Medal Board before vinyl

Medal Board Completed!


Tuesday, November 14, 2017

Flower Girl Wands

My fiance has the cutest little nieces ever!  I decided I wanted them to do something other than the normal throwing of flowers when they walk down the isle (hopefully they will make it all the way).  Thank you pintrest for the inspirations!  We do not have specific colors for the wedding other than the bridesmaids and groomsmen have lapis (purple) dresses or ties.  Other than that, I wanted bright, fun colors.

For the flower girl wand, there were so many options and ways we could do it that it was a bit overwhelming.  I decided that I did want an actual flower on the wand with some fun ribbon streamers and little bells so that you could hear them coming.

Supplies:
Ribbon- whatever and however much you would like
12" dowl rods
Glue gun
small bells
white floral tape
Pretty Flowers


I would suggest to glue the flowers on the rob and then add the floral tape to ensure the flowers are secure.


Wrap the wood stick with ribbon and... tada! You have some super cute flower girl wands.  Our nieces loved them.  And then of course they got to take them home to play with later.

Don't we have some of the cutest little flower girls.


Photo credit: RachelMyersPhotography


Friday, August 25, 2017

Table "numbers"

My fiance and I LOVE to travel.  Instead of the normal table numbers, we decided to have tables with places that we have been together.  I needed something to hold the papers showing the locations of where people are going to be sitting.  Wine corks! (If you have seen the ring toss post, then you know we drink wine.)

The base of our picture holders needed to be substantial enough to have a wire going about 8-10" high that will hold the locations.

Using 8 wine corks per number stand, we created our table number holders.


I decided that the needed a little extra color, so I added ribbon and then some cute little flowers to each of them.


And tada! Super cute table number holders. This picture is from the wedding and all I can say is AMAZING! (And if you have not already figured it out, we had by far the best photographer wife and husband team!)


Photo credit: RachelMyersPhotography


Tuesday, May 9, 2017

Marry Me!

I have to have the most thoughtful and best fiance ever!  He knows I like to do "crafty" things and when I saw wall hangings made out of license plates, we made one representing my college.  Baylor Bears!


One night, he tells me he wants help making one for his college so I figured, sure, we made one we can do another one- easy enough.  So he tells me to lay out the letters, we will take measurements and then make it.  He went to Missouri University- the Tigers- MIZZOU for short.  I say this, because other than the M, I kept asking, what are we spelling again? Very confused but not completely usual for me either.

Well, come to find out, we were not spelling anything to do with his school- he proposed!

Now to actually make the sign from the proposal because we do want it our wedding.


Saturday, May 6, 2017

Organizational Skills

Like many other people I am sure, I have tried several different ways to keep my life, both work and personal, organized.  I am always having sticky notes for this, or random pieces of paper for that.  Well enough of all of that.  A friend of mine turned me onto the Bullet Journal- best thing ever!

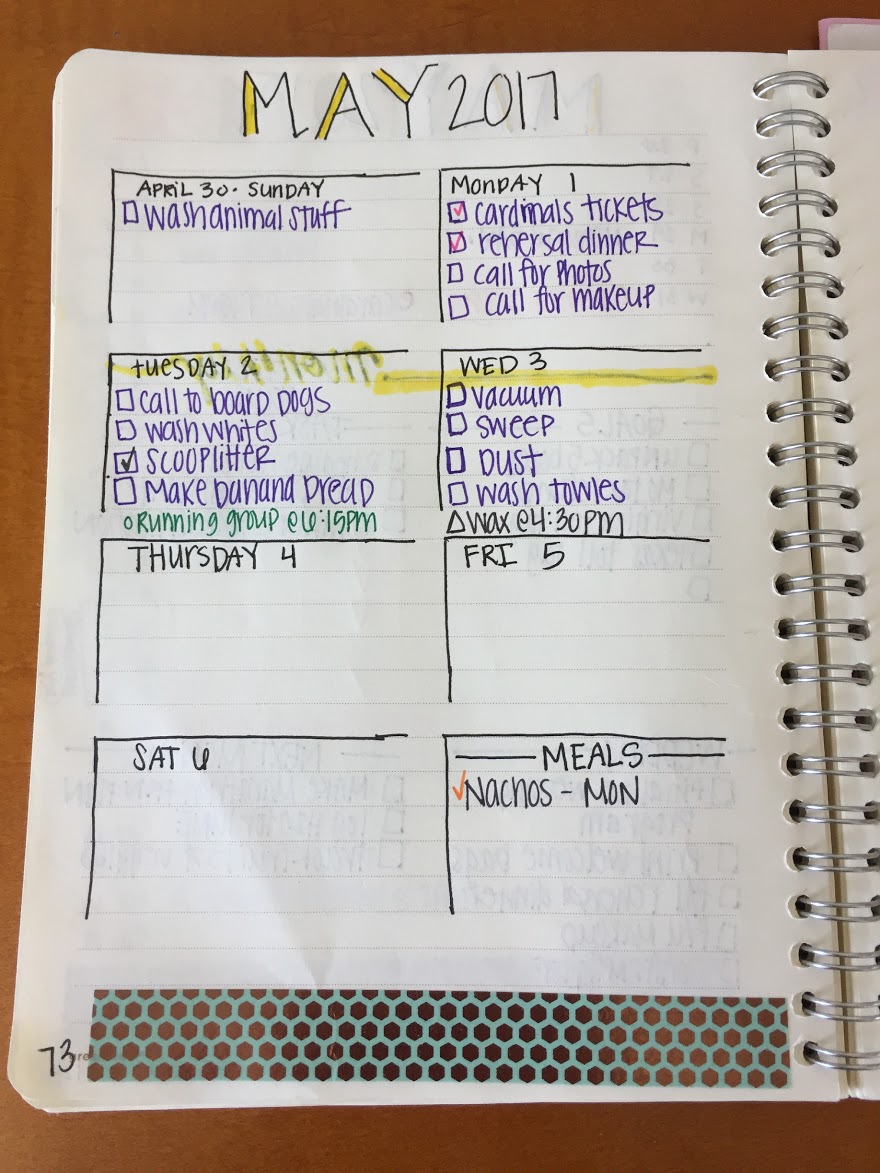
What is this bullet journal you ask?  Well, the best thing since cake!  (I know, it is supposed to be best thing since sliced bread- but I like cake better.)  After watching the video from the original bullet journal plus a handful of other individuals takes on it, I adapted it to my needs.  I wanted something to keep track of wedding planning, workouts, training plans, projects wanting to work on and then just the normal daily activities.  Below are a few samples of my journal.

Necessities:
Journal- I picked a less expensive one in case I did like it so mine is lined.  When it is time for the next one, I will be purchasing the Leuchtturn1917.

Fun colored pens- because who doesn't like fun colors.
And washi tape- because again, add some color.


Now to the pages.
Future Log- super important because now I know what is going on for a year in advance.

Monthly view- also important because now I see more details on my monthly basis with some set goals, tasks, wedding stuff, and things for next month.

Daily view- There is only so much time in the day so I cannot overload things that I need to do. I also use this as a spot to figure out what to make for the week.  Not a ton of planning but at least I get a bit of a grocery list together.

One of my favorite collections- my training plan for a half marathon coming up!  This one I am tracking a little bit of everything.  Xtraining, running, weight, dog walks, H20 intake- everything!  I am even tracking how many drinks, or rather limiting, my weekly drinks. No more than 5.

Projects- I always have a list of different things that going on but never seem to know what to work on. So my project lists.
 

And food- so now I don't have to stand in front of the fridge wondering what to make for dinner and it makes it easier to make my weekly meal plan.

Last- my wedding planning, well everything!


Thursday, May 4, 2017

ABC's for kids

Time for creativity again with the kiddos!

I have several nieces and nephews- all young so perfect time for their learning!  I made these soft and washable alphabets for them to help learn their letters.  They are fun colors on both sides with a little carry pouch that can go anywhere.  These can be found on my Etsy shop if you would like some for you (or your kiddos).


One of my nieces even got this crazy soft blanket for her to crawl around on.  I really should make one of these for me.  It has the soft fabric on both sides with the silky boarder that as a kid, I could just sit there with forever and it would instantly relax me. (ie no more crying)